



Beginner's Guide to Growing Peppers Organically (From Seedling to Harvest)

The Short Version (If You Just Want the Peppers)
- Start seeds inside 8–10 weeks before your last frost, and put them on a heat mat (80–85°F). This is the step folks skip, and it's the one that matters most.
- Don't rush them outside. Wait till nights stay above 55°F and the soil's warmed to 65–70°F.
- Feed Plant Juice while they're leafing out, then switch to Bloom Juice the second you see flowers.
- Water deep and water steady. Wishy-washy watering is the #1 reason peppers drop their flowers and give you nothing.
- Full sun (6–8 hours) plus a couple inches of mulch, and honestly? They mostly take care of themselves.
Let me just say it: peppers scared me for years.
They're slow. They're fussy about the weather. And the minute you take your eye off them, they drop every last flower like you personally offended them. If you've tried peppers before and ended up with a big green plant and, like, three sad little fruits—I've been exactly there. It's not you.
But here's the good news, and it's the whole reason I'm writing this. Once I stopped fussing over the plant and started paying attention to the soil, everything got easier. Not harder. Easier. My peppers are now some of the most reliable, hands-off things in my whole garden—and I want that for you too.
So if you're the kind of gardener who wants a better harvest without babysitting your plants (or killing them again), and you'd rather not spray a bunch of synthetic stuff around your kids and your food while you're at it—pull up a chair. This one's for you.
Why Bother Growing Peppers Organically?

Fair question. A pepper's a pepper, right?
Sort of. Here's the difference. When you garden the conventional way—synthetic fertilizer, chemical bug sprays—you do get fruit. But you also get residue on the food you're about to feed your family, soil that gets a little more lifeless every year, and a garden that's basically hooked on those bottles. Miss a feeding and everything sulks.
Growing organically is a whole different deal. You're not feeding the plant—you're feeding the soil, and the soil feeds the plant. There's a whole living world down there doing the work for you. Little critters like Azospirillum brasilense and Pseudomonas putida, fungi like Mortierella, and dozens of others are unlocking nutrients, fighting off disease, and quietly telling your peppers to grow. You can't see any of it. But your plants sure can feel it.
And here's the part I care about most, as a mom: whatever goes in that soil ends up in the pepper. Which ends up on your plate. Which ends up in your kid.
The soil science, minus the headache:
- Synthetic fertilizer feeds the plant fast—but it skips (and slowly wrecks) the living part of your soil
- Organic feeds the soil first, and the soil takes it from there
- Those soil microbes turn old leaves and compost into food your plant can actually use, right when it needs it
- Living soil gets better every year. Dead soil just gets needier.
Want to nerd out on why that underground layer matters so much? I wrote a whole post on why organic soil amendments are the real secret most people never hear about. And if you're trying to get the chemicals out of the veggie patch entirely, here's how to build a chemical-free vegetable garden from the ground up.
Starting Pepper Seeds: The Mistake Almost Everyone Makes

Peppers are slow to sprout. Not "hmm, taking a while" slow. Slow slow.
If you've ever planted peppers and tomatoes on the same day, then watched the tomatoes shoot up while the peppers just… sat there, looking like nothing was happening—yep. That's peppers. Totally normal. Don't panic and don't dig them up to check (I've done that too, and no, it doesn't help).
The real mistake most beginners make is starting too late. Peppers need a solid 8–10 weeks indoors before they go outside. So grab a calendar, count backwards from your last frost, and circle the day. (Not sure when that is? Here's a quick way to find your hardiness zone.)
What your pepper seeds actually need:
- A good seed-starting mix. Not the heavy potting soil from the bottom of the bag—that's too dense for baby roots. You want something light and fluffy that drains but stays a little moist.
- Heat. This is the big one. Pepper seeds want warm feet—80 to 85°F down at the soil. A cheap seedling heat mat under the tray is honestly the difference between "why won't these sprout" and "oh hey, they all came up."
- Moist, not soaked. Keep the mix damp like a wrung-out sponge. Pop a humidity dome on top till you see green, then take it off so your seedlings don't get that fungus that melts them at the soil line. (It's called damping off, and it's heartbreaking.)
- Light, and lots of it. Once they sprout, peppers are little light hogs. A sunny south window can work, but a grow light on for 14–16 hours makes way sturdier plants. If your seedlings get tall, floppy, and pale, that's almost always not enough light—not too much water.
- Patience. I mean it. Even in perfect conditions peppers can take 10 to 21 days to show up. Do not give up on them at day 8. They're coming.
Lauren's tip: Once my seedlings get their first "true" leaves, I give them a super-diluted drink of Plant Juice—just a teaspoon in a gallon of water. It gets those good microbes into the root zone nice and early and gives the little guys a gentle boost without burning them. The first time I tried it, the difference genuinely made me laugh out loud.
Transplanting: Please Don't Rush It

I know the feeling. The sun's out, your seedlings look ready, and you just want to get them in the ground. But putting peppers out too early is one of the fastest ways to stall them for weeks.
Peppers are tropical at heart. They do not like cold dirt. At all. So hold off until:
- Nighttime temps are staying above 55°F (below that, peppers basically hit pause)
- The soil's warmed to at least 65°F—70°F is even happier
- You've hardened them off for a week or so
"Hardening off" sounds fancy but it just means letting your pampered indoor babies get used to the real world. Set them outside somewhere sheltered for an hour the first day. Two hours the next. Build up over a week until they can handle a half-day of sun. Skip this and they'll go into shock, drop leaves, and pout for weeks. Do it, and they barely notice the move.
How to prep the hole (the organic way):
Dig it a little bigger than the root ball. Toss a good handful of worm castings—we use our Ancient Soil—into the dirt you'll backfill with. Worm castings are Class A certified compost that's absolutely alive with good microbes, so instead of dropping your seedling into dead, packed-down ground, you're tucking it into a living little welcome mat.
Then pour a diluted cup of Plant Juice right in the hole before you set the plant. That gets hundreds of beneficial microbes onto those roots from minute one, so they settle in faster and skip most of the transplant sulk. Some of the microbes in Plant Juice—Pseudomonas putida, Flavobacterium, Variovorax paradoxus—actually make natural rooting hormones (auxins) that tell roots to spread out. The lab folks at BiomeMakers found 84% of the microbial activity in Plant Juice produces those auxins. That's not me talking it up—that's third-party lab work.
Give Your Transplants a Fighting Chance
Plant Juice is CDFA Certified Organic with 291 verified microbial species. Pour it in the hole, soak the roots, and let the little critters do the heavy lifting.
Shop Plant Juice — $19.95 + Worm CastingsFeeding Peppers All Season (Without Overthinking It)

Here's where a lot of good gardeners trip up, myself included: they keep pouring on nitrogen all summer long.
Nitrogen is great—for leaves. But peppers need to switch gears. Keep hitting them with nitrogen after they start flowering and you'll grow this gorgeous, jungly, deep-green plant with almost no peppers on it. (Ask me how I know. My first "real" organic pepper year? Beautiful plants. Four peppers. Total. I was so proud and so disappointed at the same time.)
The easiest way to think about it is two phases:
🌿 Phase 1: Growing Up
From transplant until you spot the first flower buds. You want leaves, stems, and roots. Give them Plant Juice once a week—its microbes free up as much as 80% of the nitrogen in your soil, no synthetic anything required.
🌸 Phase 2: Making Peppers
The moment you see buds, switch it up. Now you want phosphorus and potassium, not nitrogen. Our Bloom Juice is built for exactly this—192 verified microbial species, 94% nitrogen release and 52% phosphorus solubilization to help those flowers actually turn into fruit.
A dead-simple feeding schedule:
- Weeks 1–4 after transplant: Plant Juice, 1 oz per gallon, once a week as a soil drench
- First buds show up: Switch to Bloom Juice, 1 oz per gallon, every 7–10 days
- Middle of summer: Scratch a little ring of worm castings into the soil around each plant—about 2 inches wide
- All season: Mulch, mulch, mulch. A couple inches of straw or wood chips keeps the soil evenly moist and steady in temperature—two things peppers are weirdly picky about
Debra A. — Verified Buyer
"This is a GREAT product! I've been using it on my extensive organic gardens and it really does what it says. Plants that hadn't been doing well revived and others became more prolific! I've now reordered several times and plan to continue doing so."
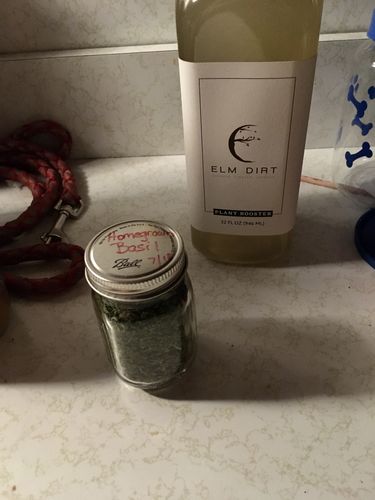
Carrie V. — Verified Buyer
"This stuff is great! My basil was fizzling out at the end of the season. I used this for a boost and it loved it! I was able to fill my basil jar up after that! It's completely organic and goes a long way!"
Water, Sun, and the Problems That'll Trip You Up

Peppers act tough, but they're not nearly as drought-proof as people think. Sloppy, on-again-off-again watering is the #1 reason they drop their flowers and give you a lousy harvest. And is there anything sadder in gardening than a plant full of little flowers that just… fall off? You're so close. Then nothing.
Watering, kept simple:
- Water deep, not often. You want it soaking down about 6 inches so roots grow down after it
- Let the top inch dry out between drinks—but never let the plant actually wilt
- Water the soil, not the leaves. Wet foliage is an invitation for fungus
- Mulch. Seriously. It's your best friend for keeping moisture steady
As for sun: peppers want full sun, and they mean it. Six to eight hours of direct light a day, minimum. Give them less and you'll get a plant that looks fine but just won't set much fruit.
The usual pepper troubles (and easy fixes):
- Flowers dropping — Almost always temperature swings or uneven watering. Peppers bail on their blooms when nights dip below 55°F or the soil dries out fast. Mulch and steady watering fix most of it. (Still getting flowers but no peppers? My guide to why pepper plants aren't producing walks through every cause.)
- Yellowing leaves — Usually not enough nitrogen, or too much water. If they're yellowing from the bottom up, think nitrogen. If they're yellow and kind of mushy, check your drainage.
- Fruit coming in slow — Scratch in some worm castings and switch to Bloom Juice if you haven't. The Sphingomonas and Stenotrophomonas in Bloom Juice help free up phosphorus, and phosphorus is what fruit runs on.
- Aphids — A good blast from the hose knocks most of them off. For stubborn ones, a little diluted neem oil (organic) does the trick. Funny thing—healthy plants in living soil just get bugged less, because those microbes help the plant defend itself.
- Sunscald — Pale, papery patches on the sunny side of the fruit. In really hot climates, a bit of shade cloth over the top during blazing afternoons prevents it.
Want to get ahead of the bugs before they start? My post on organic pest control for vegetables is worth a bookmark.
Picking Your Peppers: When and How

Here's a thing that blew my mind when I started: you don't have to wait for peppers to change color.
Every sweet pepper starts out green and ripens into its "real" color—red, orange, yellow, even chocolate, depending on the type. A green bell pepper is just a red (or yellow, or orange) one that hasn't gotten there yet. So it's your call. Pick them green and the plant hustles to make more. Let them ripen all the way and you get sweeter, richer peppers—just fewer of them.
A few harvest tips:
- Use scissors or snips, not your hands. Yanking can snap branches and stress the whole plant
- Pick often. A plant loaded with overripe peppers basically decides it's done and quits flowering
- Hot peppers? Gloves. That heat lingers on your fingers and you do not want to rub your eye later. (Ask me how I learned that one. Ghost peppers. Never again.)
- Peppers keep in the fridge a week or two, or roast and freeze them and you've got summer in January
One more trick: if frost is coming and you've still got green peppers on the vine, pull the whole plant—roots and all—and hang it upside down somewhere cool and dark. The peppers keep ripening right off the plant. I found this out by total accident one fall and it stretched my harvest by three whole weeks.
No Garden? Grow Peppers in Pots (It Works Great)
No yard, or just not much of one? Don't count yourself out. Peppers are honestly one of the best things to grow in containers. A pot warms up faster in spring, and you can scoot it around to chase the best sun—which is a nice little cheat.
- Pot size: 5 gallons minimum per plant. Bigger's better—7 to 10 gallons gives the roots room and holds water longer, so you're not out there twice a day
- Soil: A good organic potting mix with worm castings worked in (about a quarter of the mix). The castings bring the living, slow-feeding part that plain potting soil is missing
- Feeding: Pots can't pull from the ground, so they get hungry faster. Plant Juice every 7–10 days, then Bloom Juice once flowers show
- Water: Containers dry out fast—come peak summer you might water every single day. Poke a finger an inch down; if it's dry, give them a drink
My guide to growing veggies in containers on a patio has a bunch more tips for small spaces.
What's Actually Happening Down in the Dirt
If you're the type who wants to know why it works (I sure am), here's what third-party BiomeMakers testing found living in Plant Juice (Report CUX005):
- 80% nitrogen release — unlocking the nitrogen that's already in your soil so pepper roots can grab it
- 84% auxin production — the natural rooting hormone that gets roots spreading
- 82% ACC deaminase activity — a mouthful, but it just means less stress-wilting and fewer dropped leaves when things get hot
- 27% phosphorus solubilization — phosphorus is the fuel for flowers and fruit
- 56% antifungal activity — a natural shield against the soil diseases that love to hit peppers, like Phytophthora and Pythium
These aren't chemicals you're dumping in. They're living things that move into your soil and get to work every time you water. Kind of amazing, honestly.
291 Microbial Species Verified CDFA Certified Organic 100% American-Sourced Third-Party Lab Tested
Your Pepper Questions, Answered
When should I start pepper seeds indoors?
About 8–10 weeks before your last frost. Peppers are slow to sprout and grow, so they need that head start to give you a real harvest. Use the USDA hardiness map—or our zone guide—to figure out your frost date.
What's the best organic fertilizer for peppers?
A living, microbe-based one like Elm Dirt Plant Juice while they're growing leaves—it brings nitrogen and good bugs that help the roots feed themselves. Then switch to Bloom Juice once flowers show up to help set fruit.
How often do I water pepper plants?
Keep the soil evenly moist—not soggy. Water deep whenever the top inch feels dry. In hot weather that might be every 2–3 days in the ground, or daily in pots. Uneven watering is a top cause of dropped flowers, so steady wins here.
Can I really grow peppers organically in pots?
Absolutely—they love it. Use a 5-gallon pot at minimum, fill it with good organic potting mix plus worm castings, and feed regularly with a liquid organic fertilizer like Plant Juice. Just remember pots dry out fast, so check the moisture daily in summer.
Why won't my pepper plants make any peppers?
Usually one of these: it's too hot or too cold (they like 70–85°F days), watering's been uneven, there's too much nitrogen late in the season, or the flowers aren't getting pollinated. Switching to a phosphorus-rich bloom feed when flowers appear—and giving the plants a gentle shake to help pollination—often turns it right around. My full guide to why pepper plants aren't producing covers each one.
You've Got This. Just Start With the Soil.
Growing good organic peppers isn't about doing everything perfectly. It's really just knowing what they want—warmth, steady water, the right food at the right time, and living soil underneath them—and then giving them those things without making it complicated.
I started Elm Dirt because I wanted fertilizers that worked with the soil instead of against it. And I'll be honest about where that came from: my six-month-old grabbed two fistfuls of backyard dirt and shoved them in her mouth (she was fast, and extremely committed), and I realized I had no idea what was actually in that soil. As a chemical engineer and a mom, I couldn't just shrug that off.
So I dug in—literally and figuratively—and built our whole line around living soil and beneficial microbes instead of synthetic shortcuts. Not because it sounds nice on a label, but because I wanted it in the ground my own kids play in.
Start with good soil. Feed the living stuff in it. Be a little patient with your peppers. And then enjoy every single one you pick—because peppers grown in living soil just taste different. Better. You'll catch it on the very first bite.
Ready for Your Best Pepper Year Yet?
Plant Juice + Bloom Juice is the whole two-step system, seedling to harvest. CDFA Certified Organic. 291 verified microbial species. Real results, zero synthetic chemicals.
Shop Plant Juice Shop Bloom Juice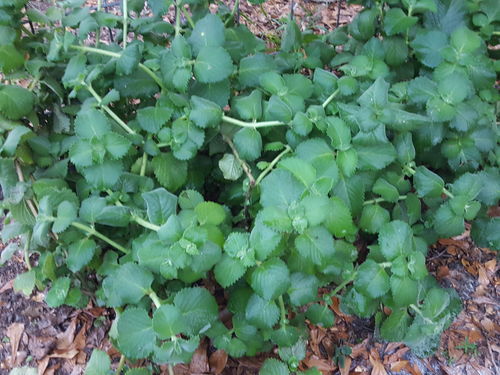
Garrett R. — Verified Buyer
"This product took my pale, struggling organic Cuban Organo Plant to a prize-winning specimen. I utilized 1 oz of both (Elm Dirt Plant Juice & Bloom Juice) per gallon of non-chlorinated water, two times a week for 8 weeks through foliar feeding."
Keep Growing: More From the Blog
- Why Your Pepper Plants Aren't Producing (And How to Fix It)
- Organic Vegetable Gardening: A Complete Guide
- How to Build a Chemical-Free Vegetable Garden
- Companion Planting for a Better Harvest
- 5 Reasons to Stop Using Synthetic Fertilizers
